How to Open a Formerly Save Microsoft Word File After Saving Again
About this book
Microsoft Power Apps provides a powerful, low-code solution for application development, empowering non-technical users to create robust, applied solutions in no fourth dimension. This book will help yous create a broad range of custom business organization solutions using the ease of evolution that Power Apps provides by overcoming many of the challenges faced in concern application development.
Y'all'll get-go by getting to grips with Power Apps Studio and finding out how canvas apps assist you build pixel-perfect applications as per business needs. The volume then covers the practicalities involved in designing model-driven apps and teaches you lot how to automate business organization processes using Power Automate. You'll also discover how to improve user experience (UX) to make applications more appealing. As you lot advance, you'll learn how to strengthen your business concern apps past using AI Builder's artificial intelligence capabilities. You'll also explore advanced troubleshooting techniques to notice artistic ways to overcome various challenges in your Power Apps solutions. The book concludes with Power Apps Component Framework to help you further improve the existing applications' capabilities.
By the end of this book, you'll accept gained feel in developing applications using the Power Apps platform and its features.
- Publication date:
- January 2021
- Publisher
- Packt
- Pages
- 376
- ISBN
- 9781800569553
Affiliate ii: Building from information with model-driven apps
Model-driven apps are the data-centric siblings of canvas apps. They get their foundation from the business data model, taking an arroyo of placing building blocks on acme of data. These blocks build up in a standard responsive layout, which allows the creation of a solution that adapts to any device.
Even though analyzing and setting up the data source is 1 of the main objectives of any application solution, this is the primary objective in these types of apps. Having a complete understanding of the business process gives you the power to blueprint your data model with a strong structure in mind to back up the proposed solution. The final step would be to build the app on acme of this model.
This chapter volition explore the model-driven world of Ability Apps while edifice a aid desk solution. Through these recipes, you will get a clear view of all the components bachelor in this platform:
- Exploring Dataverse
- Building a assist desk solution
- Defining data structures
- Building the model-driven app
- Setting up business process logic
- Designing dashboards to visualize data
- Integrating sail apps within model-driven apps
Technical requirements
Working with apps that are born from data requires a detail construction detailed in this chapter; this means that the following recipes need to be addressed in sequence to build a complete model-driven solution.
The complete version of this application is bachelor from our GitHub repository at https://github.com/PacktPublishing/Microsoft-Power-Apps-Cookbook/tree/master/Chapter02
Licensing requirements
When building model-driven solutions, there are some specific licensing requirements from Power Apps. Please refer to the Preface section of this book to become more than information about the licensing model of this platform.
Exploring Dataverse
For model-driven apps, when we talk about the data model, we mean Dataverse. The information gets stored in tables just like regular databases. The divergence lies in the rich fix of business-oriented features:
- Leverage a set of standard business organization tables out of the box with the ability to add your own custom tables.
- Create a tabular array, and it volition automatically add together all columns to address the underlying process requirements, such every bit owner info, tracking, status, versioning, and the like.
- Structure your data with various column data types, which helps in complex data modeling scenarios.
- Design relationships and define keys to standard and custom tables to ensure data integrity across the service.
- Enforce security on roles, records, and column levels, giving you lot complete flexibility when setting up data access.
- Add together business features right from the table configuration: data consumption through views, data manipulation through forms, information visualization through dashboards and charts, and last but non to the lowest degree, concern rules to apply a prepare of validations and logic without writing code.
Here'southward an case of what tables look like:

Figure 2.1 – Tabular array example in Dataverse
To store these tables, Dataverse uses environments that deed as a container non but for data but likewise for all the components that interact with it, such as applications, flows, and business concern processes.
Besides these features, Dataverse also manages solutions to package apps and components from one environs to another. This feature allows the implementation of awarding life cycle direction (ALM) for the whole Power Platform. For more information, delight refer to https://docs.microsoft.com/en-us/power-platform/alm/basics-alm
Dataverse is also the service Dynamics 365 applications apply to shop data; this ways that you can interact with the data that your business is already using.
Building a assist desk-bound solution
When you configure Dataverse for the commencement time, information technology will help create business organisation-axial applications with a fix of base of operations tables, such as Account, Contact, and Organisation. Starting from those, you would but need to add custom tables that your processes might demand to achieve their goal. With this recipe, we will create an application that will help handle a help desk service.
Getting prepare
To build our solution, we will showtime by setting upwardly a new surround and use it as our evolution area. Then, nosotros tin pack our solution and deploy it wherever it is needed.
How to exercise information technology…
- Go to the Power Apps admin centre past opening this URL: https://admin.powerplatform.microsoft.com, or https://aka.ms/ppac for short. Yous can also navigate from Power Apps by clicking on the upper-correct gear icon and selecting Admin center.
- Once in the admin center, select Environments on the left menu and and then click on New. This activeness volition open a console where you will demand to draw your new environment. Choose a proper name and a region close to yous, and describe the purpose. For the Type, you lot tin can select Product, Sandbox, or Trial. Production is where your solutions operate for terminate users, Sandbox is for testing solutions, and Trial is a xxx-mean solar day environment meant to test new features. It will likewise ask y'all whether you desire to have a database created for this surroundings; as nosotros volition need i for our solution, please select Aye and then click on Next:

Figure 2.ii – Surround settings
- In the next panel, you will demand to set up the default language for the interface, the URL prefix to access your new environment, for example,
ampihelpdesk, and the required currency for reporting purposes. Select whether y'all want to enable Dynamics 365 apps (given that you have the required licenses and only for the default region) and whether yous're going to add sample apps and data. Finally, pre-define the security to access your environment by selecting a security group, and then click on Salve:
Figure 2.three – Database settings
- The admin center will start the provisioning of your surround. After a couple of minutes, it will announced equally Prepare, and then you tin can go to Power Apps to brainstorm working with it.
How it works…
From Power Apps, select your newly created surroundings from the list past clicking on the current one on the top right of the interface:

Figure 2.four – Environment listing
After making this option, nosotros will only see information related to this environment, such equally apps, flows, and connections.
We will define the custom tables needed for our assistance desk-bound solution in the Defining information structures recipe.
Defining information structures
To support our help desk-bound solution, we are going to use related tables as our data source. We volition design a base column template to keep track of all the data needed. You can customize it to your ain needs.
Explanation and overview
The following tables will make up our solution'south data structure with the main focus on the Ticket table; this volition exist the one from which all other tables volition take their relationship. Let'due south outset with this one and and then move on to the rest.
Ticket
This tabular array will hold the base of operations data of the help desk ticket, and information technology'due south going to be the primary object of our information model. The column structure is as follows:
- Title [Text]
- Description [Text Area]
- Ticket Condition [Choice]
- Priority [Pick]
- Customer validation [Option]
- Resolution [Text Expanse]
Ticket operation
Related to the Ticket table, this will hold the specific operations executed to solve the ticket. The structure is as follows:
- Title [Text]
- Description [Text Area]
- Functioning Status [Selection]
- Duration [Duration]
Project
All tickets are going to be associated with a customer's project. The construction is as follows:
- Title [Text]
- Description [Text Area]
- Start [Appointment Only]
- End [Engagement Simply]
Account
Nosotros will take advantage of one of the default business tables that comes with Dataverse when a new database gets created. This table holds our customers' information.
How to do information technology…
- In the Tables section, select New Table from the tiptop toolbar. On the console that opens, fill in the required information to create the construction.
For the tabular array section, set Display proper noun and the plural form, such as
TicketandTickets. For the Name field, yous tin can put the same equally the display name; the system will automatically generate a prefix to assist brand your name unique. - Principal Proper name Cavalcade is the master identifier in this table. For the Ticket table, input
Championship. Cull something that your users can also apply to select the rows when the system is listing them. - Depending on the needs of your table, yous might want to Enable attachments. For example, it might be useful in the Ticket tabular array to include extra information about the incident that started the ticket, such as screenshots or PDF files.
- One time we have entered all the required information, you can click on Washed. The system volition then start creating the tabular array with the specified chief name column and the rest of the business organization-oriented columns.
The post-obit is an example of the Ticket table:

Figure 2.5 – Ticket table base construction
- Now we can start shaping the tabular array by adding the residuum of the required columns. Click on Add column, and in the Display proper noun field, input
Description, and for the Name field, change information technology back to lowercase every bitdescription. Set Data type to Text Area and click on Done. - Repeat step 5 to add together the
Resolutioncolumn. - Click on Add column over again to include the
Ticket Statuscavalcade. For Data type, select Choice. Selecting this will display a new dropdown to cull from the existing choice columns. Choose + New choice from this dropdown, and in the Items department, remove the existing one and add together these:New,Pending,Resolved, andAirtight. Finally, click on Save and then Done. - Echo stride 7 for the
Ticket Prioritycavalcade, adding the following items:Depression,Medium, andLoftier. - Over again, repeat step vii for the
Ticket Validationcolumn, addingTelephoneandEmailfor the items.Here'due south an example of the
Ticket Statuscolumn settings:
Figure two.half dozen – Condition column sample
- When y'all complete the cosmos of the columns, click on Save Table.
- Click on Tables on the left pane and and so on New Table to add the Ticket operation table. For Primary Name Column, apply
Title. Remember to modify the Proper name fields to lowercase, and so click Done. - When the table completes the provisioning, click on Add cavalcade to add together the
Descriptioncolumn using Text Area every bit its Data blazon value, and then click Washed. - Click on Add column again to add together the
Operation Statuscolumn. For Data type, select Pick, and from the dropdown, choose the i we created in step seven,Ticket Condition, and then click Washed. - Again, click on Add cavalcade to create the last column on this tabular array,
Duration. For Data type, select Duration and click Done, then click on Save Tabular array. - Go back to the tables listing by click on Tables on the left pane, and then click on New Table to add together the
Projecttable. UseTitlefor Primary Name Column and set the Name fields to lowercase. Click Done. - Once the provisioning completes, click on Add column to add together the
Clarificationcolumn using Text Surface area as its Information type value, and so click Done. - Click on Add together column to create the
Startcolumn. Set Data blazon to Date Only so click Done. Echo this step to brand theEndcavalcade. - Click Salvage Table to complete the configuration of the
Projecttabular array. - Let's configure the relationship between tables to maintain data integrity in our solution. From the Tables list, select to open the
Tickettable, and then click on the Relationships tab. In the toolbar, click on Add relationship and then choose One-to-many. This kind of relationship roughly means that one chemical element from one side (Ticket) tin have many child items on the other (Ticket Operations). - When the panel opens, select Ticket Operation from the Related (Many) list. This action will create a lookup column to connect both tables. You lot can configure more settings in the avant-garde department regarding which activity gets taken when a record gets deleted. To keep data integrity, you might desire to avoid a ticket deletion without removing the ticket operations get-go. In this case, we are going to restrict deletions. When finished, click on Done and then Save Table. For more information on relationships, delight refer to https://docs.microsoft.com/en-us/powerapps/maker/common-data-service/data-platform-entity-lookup#add-advanced-relationship-beliefs
- Echo steps 8 and 9 to configure the One-to-many relationship between
Projection(ane) andTicket(many), and finally betwixtAccount(one) andProject(many):
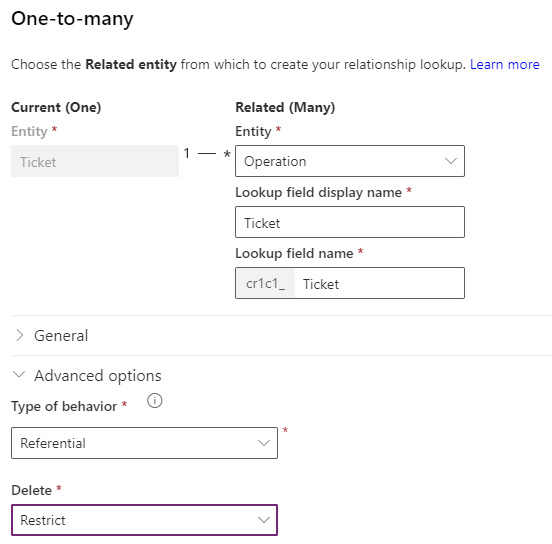
Effigy 2.7 – Human relationship example
How it works…
We now have the data structure and relationships in place. To start entering information in our tables, we need to complete the required modifications in the next recipe's data forms, Building the model-driven app. However, the Account table comes past default in the system, so everything is already configured to enter data.
From the Tables list, select to open the Account tabular array, so select the Data tab. In the toolbar, click on Add tape. This action will open a new browser tab with a form to load information. Make full in all the desired columns then click Relieve & Shut from the toolbar if y'all want to add only ane account, or click Save and and then New to add more records.
Edifice the model-driven app
Creating an application using a depression-code approach brings a dissimilar methodology when setting up the awarding building process. On other technologies, you might demand to cull the language, infrastructure, database system, and more. For model-driven applications, one of the essential principles is to build everything inside solutions.
Explanation and overview
A solution creates a container where you can store all the pieces that compose your application, which in turn aids in deployment, distribution, and management—more information on this subject area at https://docs.microsoft.com/en-us/powerapps/maker/model-driven-apps/distribute-model-driven-app
The application nosotros will create through all the recipes will get packed into a solution, and so all elements tin can be exported in but ane package and then imported into your surround.
How to exercise information technology…
- First, let'south create a solution. From Power Apps, select Solutions from the left card, and and so click on New Solution. Requite it a display name and a proper noun, and create a publisher past selecting + Publisher from the dropdown. The publisher identifies the developer and also specifies the prefix for all your custom tables and columns. Finally, set the solution version or proceed the default i.
- Select to open up your recently created solution from the list, and let'due south start adding items. Beginning, we volition include the existing tables. Click on Add existing from the toolbar, and and then click on Tabular array. Select Ticket, Ticket Performance, and Project from the listing, and and then click on Next. Marking Include all components on both tables and finally, click on Add.
- Now, permit's create the model-driven app. Click on New from the toolbar and and then App | Model-driven app. Input the Name, Unique Proper name, and Clarification values for the app, and and then click on Done. Get out the rest of the options as default:

Effigy ii.eight – New model-driven dialog
- The starting time thing that we need to gear up for our awarding is the sitemap. This component allows united states of america to configure the navigation inside our app. Following the Ability Apps platform's design, it will give you a left bill of fare to add items for the user to select. Click on the pencil next to this component to set it upwardly.
The navigation is composed of areas, groups, and subareas. Let'due south define ours past clicking on Add to include these elements.
- Use the following options as a template, and for the
Ticketsubarea, select the Entity type, then it opens our previously created table. Once you've made the changes, press Save and then Publish. Finally, click at the top left on the App Designer breadcrumb to go back to the model-driven app:
Figure 2.9 – Sitemap example
- You might have noticed that the
Tickettabular array at present appears on the entity view. This modify is due to the designer adding every related component to the app. Let's complete the table pattern, starting with the forms. - A course is a screen designed to manage the records of the tables. To configure information technology, click on the Forms element of the
Tickettable. Y'all will meet a panel that opens on the right with the list of all forms selected by default. When setting upwardly an awarding, it'south best to select only the ones that will be available, so in this case, deselect the All checkbox. Click on the pencil that appears on the right of theInformationcourse to modify it. - One time the grade designer opens, you will see that only the Main column appears. Any change after the cosmos of the tabular array needs to get included in the respective forms.
Select all the columns we created for this tabular array from the left to add them to the course. You can likewise drag and driblet the columns and components to place them as you come across fit. Make these changes and then click on Relieve, and finally on Publish. Close the designer afterward:

Effigy 2.10 – Form designer for the Ticket tabular array
- Let's continue with views. A view is a list of records organized, filtered, and sorted equally needed. Active tickets, tickets by creation appointment, and pending tickets are examples of views. Every bit with the forms, uncheck All, and let's create a view by clicking on Create New.
- When View Designer opens, prepare the name on the right panel under the Backdrop tab every bit
Awaiting tickets. On the Components tab, click on Column Attributes Primary Entity and drag and drop the desired columns from the right panel to the view in the order you lot see fit. Be certain to include the Created On column. Click on the header of each cavalcade to gear up the width as desired. - Select the Created On column's dropdown and click on Primary Sort, so we take the newest items on top.
- Expand the Filter Criteria section, located on top of the Columns section, and click on Add Filter to add a filter row. Choose Ticket Condition from the list of columns, select Does Not Equals, and click the side by side field to select from the OptionSetType values. Click the right pointer to add
AirtightorResolved, and then click OK. Finally, click on Save and then Publish. Close View Designer.The pending tickets view should look like the following screenshot:

Effigy two.11 – Awaiting tickets view example
- At present that we have configured both the forms and views of our tabular array, we can save, validate, and publish our app—the validation footstep checks for any inconsistencies in our awarding that need to get fixed.
How it works…
Later completing the previous steps, nosotros tin can test our application to verify whether it is working every bit intended.
From the Solutions department, select to open up your solution and look for the model-driven app. Select it, and from the toolbar, press Play. This action volition open the application with a carte on the left with a Tickets option within a Help desk group and in the chief display, the new Pending tickets view.
Add some records past clicking on the New button from the toolbar. If yous create one with a Ticket Status of Closed or Resolved, it should not appear on the chief view. To solve this, change the selected view in your application. In your solution, add together as many views as needed to make it easier for your users to track information:

Figure ii.12 – Model-driven application running
In the next recipes, we volition add together application logic to have information validation. We will also include a dashboard to offer a more than informative view of the concern process data.
Setting up business organization procedure logic
For every business process, there is ever a step-by-step process that defines every requirement, objective, and resolution from beginning to end. Companies build on and better these procedures depending on the business needs, and they fifty-fifty create departments to work exclusively on this.
Caption and overview
Model-driven apps aid set these rules past providing several tools to define business organisation logic on various platform levels. You can contain data validation rules and structured information flows to guide the stop user, and fifty-fifty trigger workflows for defined events on your processes. These are only some examples of what y'all can achieve with this platform.
Allow's improve our help desk app past calculation business logic to the solution we created in the previous recipe:
- Hide or make a column visible depending on the condition of a ticket using a business organization rule. In our case, at that place is no reason to have the
Customer Validationcolumn visible unless the example is in theResolvedland. - Guide the ticket processing by making sure the user inputs the required information on each defined footstep with the assistance of a business procedure menstruation (BPF). This component besides allows you to execute processes, Power Automate cloud flows, or workflows when a defined trigger gets fired.
How to practise it…
- First, open the help desk solution, and let's start past adding information validation rules to the
Ticketstable. Select the tabular array and then click on Edit. - Go to the Business rules tab, and on the toolbar, click on Add business organisation rule; this volition open up a designer where y'all tin can ascertain deportment based on a condition.
- Select the default condition, New condition, and on the right panel, set these properties:
Display Name: Customer validation visibility
Nether Rules, fix to cheque when
Ticket ConditionequalsResolvedorClosed, and then click on Apply. - Click on Add on the main toolbar to include an Add Set Visibility activeness. One time you choose this pick, two plus signs will announced next to the condition, when information technology is valid (checkmark) and another when it isn't (10). Place 1 on the checkmark and then add some other for the X.
- Select each new action and set the following properties on the right pane, and then click on Employ:
- Status is met:
Display Name:
Show Customer ValidationField:
Client ValidationVisible:
Yep - Status isn't met:
Display Name:
Hide Client ValidationField:
Client ValidationVisible:
No
- Status is met:
- Finally, click on Ticket: New business organization dominion, located at the upper left of the screen, to set the business organisation rule's name. Enter
Customer validation visibilityand so hit Salve on the toolbar, and then on Activate to brand it available for this tabular array:
Figure ii.13 – Client validation business dominion
- At present, let'south create a BPF to guide our users during the ticket processing:
- From your solution, click on the ellipsis on the toolbar and select Switch to classic. This process still requires the archetype interface to use the proper solution prefix for the BPF.
- Once the classic solution designer opens, click on Processes on the left pane and and then click New in the toolbar; this will open a new dialog to get together properties for your BPF. Set the following values for the
Tickettable and click OK:
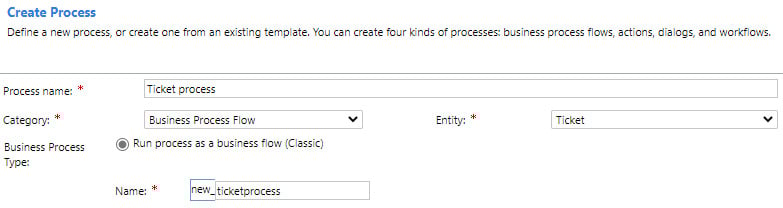
Figure ii.14 – New BPF dialog
- Once the designer opens, you lot will find a default phase. These are the steps of your guided flow. Let'due south create 3 more stages by dragging them adjacent to each other from the components panel. Click on each 1 and fix Display Proper name to the following:
New,In Progress,Resolved, andClosed. For each i, click on Apply afterward. - Each phase comes with a data footstep by default, which lets us specify the cavalcade that gets displayed in each step of our BPF, likewise equally, virtually importantly, which ones are required when moving from 1 stage to the other. Let's configure the data steps for each stage by clicking on Details and setting these values:
-
New:Information Field: Description
-
In Progress:Data Field: Description – Required
-
Resolved:Data Field: Resolution – Required
-
Closed:Data Field: Customer validation – Required
-
- Afterwards completing these changes, on the top toolbar, click on Validate to check everything is correct, and and so click Save. Finally, click on Activate to enable this BPF.
How it works…
Once nosotros take configured the business process logic for Tickets, every time this table gets invoked, it will carry on these divers components. To encounter them working, get to your solution, select the model-driven app, and click on Play; this will open the app on the Pending Tickets view. Click on New to add a ticket.
You will see that the form now includes your BPF, which lets you have a clear visualization of which stride of the process your ticket is. After saving it, if you lot try to move beyond the Resolved stage, information technology will ask you to prepare the value for the required columns:
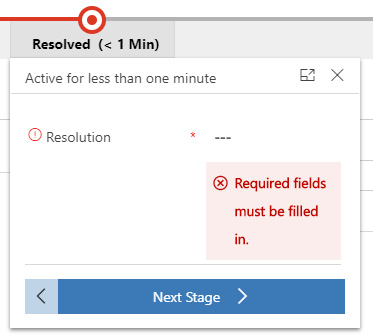
Figure two.fifteen – BPF in activeness
Equally for the business organisation rule, the Customer Validation column volition remain subconscious until the ticket condition gets changed to Resolved. Once we enter this column's data, it is and then that we can finish the BPF:
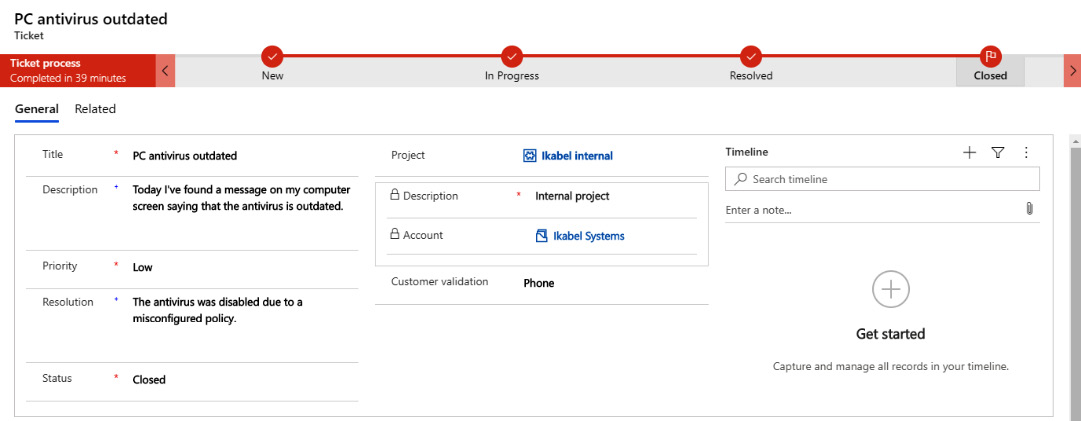
Effigy 2.sixteen – Ticket processing completed
Designing dashboards to visualize information
When working with business organization processes that deal with information, one of the main goals for organizations is to gain insights. Knowing where your operations are declining or where there is a market opportunity is vital, then having an easy way to interact with data is very important.
Dashboards are a Dataverse feature that gives you the power to display a mix of graphs, grids of information, and spider web resources in one identify. Allow'southward give more value to the help desk solution by including a ticket dashboard.
How to do information technology…
- Let'south create the charts that we are going to use in our dashboard. Starting from our solution, click on the
Ticketstable, and from the toolbar, click on Edit. - Go to the Charts tab and click on Add together nautical chart at the top; this will open up a new configuration window to define the information that the graph will utilise, the type, and the information visualization rules.
- First, cull the view that will filter the information, then select the legend entries, which are the serial of your graph, and finally, the horizontal axis, which will categorize your data. Let's create three charts using the post-obit configurations; after completing each 1, click on Save & Close:
- Standard settings for all charts:
View: Active tickets
Fable Entries: Ticket
- Nautical chart name:
Ticket by Priority– Pie chart:Horizontal Centrality: Priority
- Chart proper name:
Ticket by Project– Pie chart:Horizontal Centrality: Project
- Chart name:
Ticket past Ticket Status– Column chart:Horizontal Centrality: Ticket Status
- Standard settings for all charts:
- Now that we have defined the charts, we can place them on our dashboard. From the solution, edit the model-driven app, and on the Dashboards component, click on Create New and select Archetype Dashboards. On the dialog that opens, click on 3-Cavalcade Overview Dashboard. Nosotros will use this layout as a template:

Figure two.17 – Dashboard layouts
- In the dashboard designer, set the name of your dashboard and then start placing the sections' elements. Click on each placeholder, and from the pinnacle toolbar, select the desired resource.
- For the height section, select the commencement placeholder and click on Chart. Then, in the dialog, cull
Ticketequally Record Blazon andActive ticketsfrom the View list, and choice 1 of the charts nosotros created in step 3. Echo this for the other two placeholders. - As for the lower department, click on the placeholder and select List. Cull
Ticketequally Record Type andActive ticketsfrom the View list; this volition display a grid of records for easy access. - Hit Salve on the toolbar and shut the window to return to the model-driven editor.
- To brand our dashboard accessible in our application, we demand to modify the sitemap by clicking on the pencil icon side by side to information technology.
- Let's update the
Ticketssubarea past changing the type to Dashboard and selecting our newest one from the Default Dashboard list. Click on Save and and so on Publish.
How it works…
After completing the dashboard setup, nosotros can see information technology working in our model-driven awarding by selecting it from our solution and then clicking on Play.
When the app opens, you volition see the dashboard instead of the list of records nosotros used to accept. At a glance, this display gives insight into the current state of the help desk-bound arrangement.
If you don't run into the changes immediately, you lot might demand to practice a hard refresh of your browser window. This beliefs is due to the enshroud mechanism:
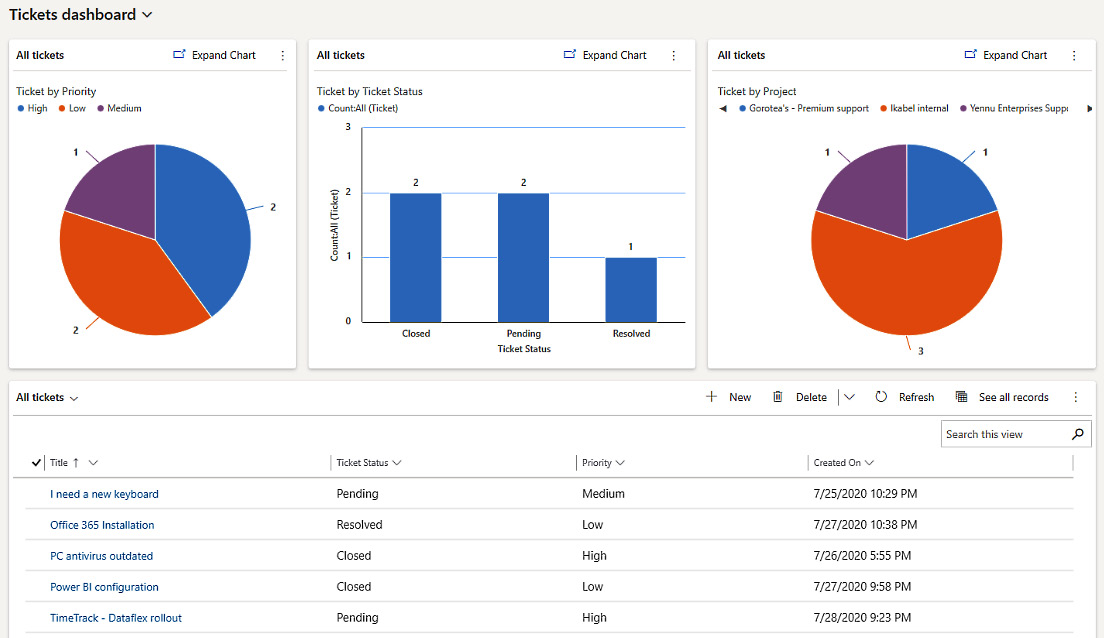
Figure 2.18 – Tickets dashboard
Integrating sail apps inside model-driven apps
One of the best features present in canvas apps is the ability to admission multiple external connectors from the same app. We tin can leverage this forcefulness by embedding a canvas as a component.
These are sample scenarios in which this tin can be very helpful:
- A canvass application that is already in production that we want to integrate into our model-driven system.
- A canvas app that connects to a legacy system using the on-bounds data gateway.
- An employee tracking system that gives the states information nigh in which of our customer locations our support staff is working at whatsoever given moment. This information could be useful to run across whether we already have someone from support at the customer location from which a new ticket has arrived.
Now allow's see how we can integrate a canvas into our model-driven solution.
How to do it…
- From our solution, select to open the
Projecttable. Then, go to the Forms tab to edit the main course. - In one case the designer opens, select the Switch to classic option from the toolbar. The Power Apps platform is even so evolving the form designer experience, then we still need to use the standard version to add some components.
- Select where you lot desire your canvas app to announced, and then, from Field Explorer on the right, elevate a column to that position. Keep in mind that this column needs to have data to make the app visible, so make sure you select a required column. In this example, I've selected
Title. - Double-click on the column and, under the characterization section, uncheck Display label on the form so that it doesn't appear next to our app.
- Go to the Controls tab and click on Add Control…, select Canvas app from the list, and click on Add. This action will add the Canvas app property section. On the list of controls, select the canvass app and cull Web, Telephone, and Tablet.
- In the Canvass property section, you will see the settings needed to link an app. To add a new one, click on Customize; this will create a new canvas app with a form using the
Projecttabular array as its data source. You volition notice a new control called ModelDrivenFormIntegration, every bit shown, which acts equally a gateway between the model-driven class and the canvas app:
Figure ii.xix – ModelDrivenFormIntegration
It works but like the SharePointIntegration control we saw in the previous chapter'due south Embedding an expense tracking list with SharePoint listing Power Apps recipe but with simply one action available. Its master purpose is to act on information refresh.
- Design your app to match your needs. Keep in mind that one of the main purposes of this integration is to take the power to link the data from the Dataverse table with our canvas app. This connection gets done by the integration control using the Item property, which carries the column data from the selected item in the model-driven app:

Figure 2.20 – Project columns in the sheet app
- Once you finish edifice your app, click on Save, and publish information technology to make it bachelor in our model-driven app. Close the sheet app studio.
- Back in the classic class designer, yous volition see that the canvass backdrop were updated to reverberate the new app's link. Click OK to save the field properties, and so save the grade, and finally, publish it. Close the classic form designer.
- Go dorsum to your solution. You lot will see that the canvass app appears automatically in the list of components.
How information technology works…
Permit'southward pretend our company is in the heart of its cloud migration, and we even so utilize a legacy ERP system to control customers' back up rights. Nosotros can build a canvas app with a custom connector, a data gateway, or a Power Automate deject menses to get data from the on-premises system. This solution tin give support representatives more insight into the customer's rights related to the ticket.
Open a ticket with an associated projection. If yous click on the Project column value, information technology volition navigate to the project form to display the related data nigh the projection:
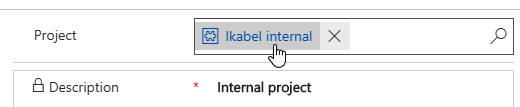
Figure 2.21 – Project tabular array navigation
As shortly as the project tabular array form appears, the model-driven integration control will notify the canvass app of the currently selected record. That will execute the OnDataRefresh action logic you specified in your app:

Figure ii.22 – Canvass app integrated into the model-driven class
This integration shows just one of the situations where a sheet app can aid a model-driven solution to accomplish something that would require adding a code solution or a third-party component. Make sure yous know all the possibilities of each type of app to leverage each 1'southward skills.
Source: https://www.packtpub.com/product/microsoft-power-apps-cookbook/9781800569553
Post a Comment for "How to Open a Formerly Save Microsoft Word File After Saving Again"